
I like the definition used in Wikipedia: “a cache is a temporary storage area where often accessed data can be stored for quick access”. The idea is to get ‘often accessed data’ from a database and store it in memory (RAM or as a file in your local file system). This is because:
it’s quicker for a machine to read from memory than to connect to a database and query data.
it’s more efficient for the database to not waste time and resources returning the same dataset multiple times when it could be focusing on other tasks.
As long as the data, in this scenario from the database, doesn’t change, there is no need to query it again.
Resources are limited on systems and to take advantage of your resources, you need to make sure time isn’t spent on tasks that could be handled better elsewhere. Here is a silly real world example. Imagine on a daily basis, I have to track how many magazines I have and send this information to Person X. I get new magazines at the beginning of each month only. To track the number of magazines I have every day I could
Count them, one by one every day and send Person X the total. If I have 50 magazines this could take some time and assume I get 10 more every month, after a year or two I could spend all day just counting how many magazines I have instead of working. Sound productive?
Count them once and write the number down on a piece of paper (caching!). Everyday when Person X asks how many magazines I have, I read the number from the piece of paper. Only when I get new magazines (once a month) do I count them again (or just add the current number + the new amount) to get my new total. Then I update my piece of paper with the new total (updating the value in cache).
The latter is definitely the more productive choice.
The same idea applies to computer systems. In the web, you have static and dynamic files. Static files are quicker to serve on a server because the server only has to read the contents of the file and send it to the browser requesting it. Dynamic pages take more time and resources because the server needs to execute the code in the page and only once it’s done can it send the request back. PHP can be used to create dynamic pages. The server executes the php code and spits out a file that then is read by the browser. If a database is involved, then the database has to run it’s task as well before the final file is returned.
When ever possible, it’s more efficient to serve a static file or static content. We use cache to accomplish this. In this post I’m going to talk about caching files and database queries to local files on the server.
Zend_Cache
There are different ways to achieve this. I personally use Zend Framework on my projects so I’ll be using Zend_Cache in my examples. I will only be using Zend_Cache as a standalone module, not the entire framework. This way, those of you who don’t use Zend Framework can still follow this guide. There are other options if you don’t have Zend such as Cache_Lite which is part of the PEAR Framework. Both work very similarly.
Zend_Cache is very flexible in that it lets you decide what you want to cache (the frontend) and where you want to put it (the backend). The different frontends for Zend_Cache include (taken from the Zend docs):
Zend_Cache_Core is a special frontend because it is the core of the module. It is a generic cache frontend and is extended by other classes.
Zend_Cache_Frontend_Output is an output-capturing frontend. It utilizes output buffering in PHP to capture everything between its start() and end() methods.
Zend_Cache_Frontend_Function caches the results of function calls. It has a single main method named call() which takes a function name and parameters for the call in an array.
Zend_Cache_Frontend_Class is different from Zend_Cache_Frontend_Function because it allows caching of object and static method calls.
Zend_Cache_Frontend_File is a frontend driven by the modification time of a “master file”. It’s really interesting for examples in configuration or templates issues. It’s also possible to use multiple master files.
Zend_Cache_Frontend_Page is like Zend_Cache_Frontend_Output but designed for a complete page. It’s impossible to useZend_Cache_Frontend_Page< for caching only a single block.
The backends include:
Zend_Cache_Backend_File – This (extended) backends stores cache records into files (in a choosen directory).
Zend_Cache_Backend_Sqlite – This (extended) backends stores cache records into a SQLite database.
Zend_Cache_Backend_Memcached – This (extended) backends stores cache records into a memcached server. memcached is a high-performance, distributed memory object caching system. To use this backend, you need a memcached daemon and the memcache PECL extension.
Zend_Cache_Backend_Apc – This (extended) backends stores cache records in shared memory through the APC (Alternative PHP Cache) extension (which is of course need for using this backend).
Zend_Cache_Backend_Xcache – This backends stores cache records in shared memory through the XCache extension (which is of course need for using this backend).
and a couple more you can check in the Zend docs.
For my first example I’ll be using the ‘Core’ frontend (to cache a variable) and the ‘File’ backend (to save that variable to a file on the server). I will actually be using the ‘File’ backend on all my examples since I have not had the opportunity to work with and of the other backend methods. Reading from RAM is quicker than reading from the file system so using other backend methods which take advantage of this would yield better results.
Setting up the Environment
Before I go into the first example, let me explain how I set up my environment. Like i mentioned earlier, I won’t be using the Zend Framework, instead I will only be using Zend_Cache as a standalone module. To accomplish this, I create a library folder in my site root. Then I create a Zend folder inside of library where I will be putting the Cache module in. The next step requires that you download the Zend Framework zip file so you can copy the cache module found in the zip (minimal package is all you need). Once you download the file, open it and copy Cache.php from /library/Zend/Cache.php and the /library/Zend/Cache folder to your Zend folder in library. Here is an image of what your structure should look like: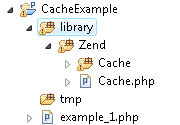
Folder Structure
Example 1 – Caching a Variable
The first example is a slightly modified version of the example given on the Zend_Cache docs:
include ‘library/Zend/Cache.php’;
$frontendOptions = array(
   ‘lifetime’ => 10,
   ‘automatic_serialization’ => true
);
$backendOptions = array(
    ‘cache_dir’ => ‘tmp/’
);
$cache = Zend_Cache::factory(‘Core’, ‘File’, $frontendOptions, $backendOptions);
$id = ‘myBigLoop’;
$start_time = microtime(true);
if(!($data = $cache->load($id)))
{
    echo "Not found in Cache
";
    $data = ”;
    for ($i = 0; $i < 1000000; $i++)
    {
        $data = $data . $i;
    }
    $cache->save($data);
}
else
{
        echo "Running from Cache
";
}
echo sprintf(‘%01.4f’, microtime(true) – $start_time);
What’s going on? First I include Zend_Cache. Next I declare two arrays with configuration values needed to use Zend_Cache. The frontendOptions array is setting a cache lifetime of 10 seconds. Meaning, after a cache file is created, it will only live for 10 seconds. After that, the cache file will be recreated. In the backendOptions array, I set the folder where I want my cache files to be saved to. I’m using a folder called ‘tmp’ that I created in the root of my site. Make sure to create that folder or your code may not work.
Next I create my $cache variable telling Zend_Cache that I want to use ‘Core’ as the frontend and ‘File’ as the backend. $id is just any name you want to give to this particular cached value. If you wanted to cache two different variables, you would want to use two different id’s for each to not overwrite one-another. $start_time is going to track when my code started running so I can check how long it took to execute my loop at the end.
This is where it gets fun yet so simple. The if statement checks the following
$cache->load($id) will check to see if a valid cache file exists for that $id and return it.
$data is set to the return of $cache->load (whether there is or isn’t anything there)
Finally the if checks to see if there is NO data in $data and if so, processes the loop else echos ‘Running from Cache’
If the if statement determines there is NO data in cache, it will continue with the code to do a loop. The for statement will loop 1,000,000 – one million times, and append each number to the variable $data. After it is done running a million times, it saves the variable $data into cache using the $id declared in the $cache->load() call. When it’s done the code spits out the time it took to execute this code. In my server it’s usually around 0.4 seconds:
Now if it run my code again, hitting refresh, the code will go to the if() and find there is a cache file for that $id and load it – so it will not run the for loop. In this scenario, the page usually only takes about .02 to .03 seconds to execute:
That’s a nice improvement. For the next 10 seconds (while the cache file is valid since we set its lifetime to 10 seconds) the page will only take 0.03 seconds to run instead of 0.4 seconds. That’s over 15 times (94%) faster! “Rudimentary, this is a difference of serving 149 requests per minute versus 2307 requests per minute.” You can always look inside your tmp folder and see if files are being created there to make sure things are really working. If you delete them, next time you execute the page it should recreate the cache files.
Example 2 – Caching a Database RecordSet
This example will be extremely similar to the previous one. In both, we are setting a variable to hold a value, then we save that variable in cache. Each time we run the page we check for the cache file, if it exists we use it, else we query the database, get the recordset, and store it in cache.
Setting up the Database
In this example we will be using the same table ‘users’ that I used in some of my previous posts. Below is the create statement to create the table ‘users’ in the database ‘test’:
DROP TABLE IF EXISTS `test`.`users`;
CREATE TABLE  `test`.`users` (
  `users_id` INT(10) NOT NULL AUTO_INCREMENT,
  `first_name` VARCHAR(100) NOT NULL,
  `last_name` VARCHAR(100) NOT NULL,
  PRIMARY KEY (`users_id`)
) ENGINE=INNODB DEFAULT CHARSET=latin1;
Once you create the table insert the following data:
INSERT INTO users
VALUES (NULL, ‘Joey’, ‘Rivera’), (NULL, ‘John’, ‘Doe’), (NULL, ‘Joey’, ‘Tester’),
(NULL, ‘Joey’, ‘Test’), (NULL, ‘Billy’, ‘Bob’);
Ok, now the code. The objective will be to grab all the information for all the users in the table from the database. Once we have it, store it in cache until that table is updated and we need to query it again. We are going to use a null value for lifetime so that the cache file never expires and we are then going to manually – in code, delete the cache file when we know the table has been changed.
This is what the code looks like:
include ‘library/Zend/Cache.php’;
$frontendOptions = array(
‘lifetime’ => null,
‘automatic_serialization’ => true
);
$backendOptions = array(
‘cache_dir’ => ‘tmp/’
);
$cache = Zend_Cache::factory(‘Core’, ‘File’, $frontendOptions, $backendOptions);
$id = ‘rs’;
$start_time = microtime(true);
if(!($data = $cache->load($id)))
{
echo "Not found in Cache
";
mysql_connect(‘localhost’, ‘user’, ‘password’);
mysql_select_db(‘test’);
$query = ‘select * from users’;
$rs = mysql_query($query);
$data = array();
while($row = mysql_fetch_assoc($rs))
{
$data[] = $row;
}
$cache->save($data);
}
else
{
echo "Running from Cache
";
}
//echo ‘’;
//print_r($data);
//echo ‘’;
echo sprintf(‘%01.4f’, microtime(true) – $start_time);
This code is very similar to the first example. The differences are I changed the frontendOptions lifetime value from 10 seconds to null – so the cache file never expires. Then I changed the $id value to ‘rs’ so it doesn’t overwrite the example one cache file. Now instead of looping in the if statement, I connect to the database, query the users table, and create an array of all the rows returns. Then I save it in cache and echo out the time it took to execute. The next time, the code will find the cache file for this $id and go to the else statement and then echo the time.
Time taken without cache (querying database):Time taken with cache (not querying the database):
As you can see, big improvement again – 33 times (97%) faster. “This is a difference of serving 4,477 requests per minute versus 150,000 requests per minute!” Feel free to uncomment the echo/print_r to see the data from the array. You can then update one of the users name in the database and run this page again. Notice you don’t see the new change. This is because we told the cache file to never expire so no matter what changes you make to your users in the users table, this page will continue to load the data from the cache file.
Clearing the Cache File
Depending on your needs, you may want the cache file to expire every 5 minutes, 2 hours, each day, or never. Even if you set a time interval for the cache file to expire, you may at some point find yourself needing to clear the cache early so this will show you how.
Clearing the cache is as simple as calling $cache->remove($id). We need to add some code to delete a cache file when the users table is updated.include ‘library/Zend/Cache.php’;
$frontendOptions = array(
‘lifetime’ => null,
‘automatic_serialization’ => true
);
$backendOptions = array(
‘cache_dir’ => ‘tmp/’
);
$cache = Zend_Cache::factory(‘Core’, ‘File’, $frontendOptions, $backendOptions);
$id = ‘rs’;
if(isset($_GET[‘form_submit’]) && $_GET[‘form_submit’] == ‘clear’)
{
        $cache->remove($id);
}
$start_time = microtime(true);
if(!($data = $cache->load($id)))
{
echo "Not found in Cache
";
mysql_connect(‘localhost’, ‘user’, ‘password’);
mysql_select_db(‘test’);
$query = ‘select * from users’;
$rs = mysql_query($query);
$data = array();
while($row = mysql_fetch_assoc($rs))
{
$data[] = $row;
}
$cache->save($data);
}
else
{
echo "Running from Cache
";
}
echo sprintf(‘%01.4f’, microtime(true) – $start_time);
?>
The only difference between this code and the one above is I added a form at the end of the page. This form has two buttons, one we will use to reload the page without clearing the cache and the other button we will use to clear the cache after the page is submitted. If you look at the php code, you’ll notice a new if statement.
if(isset($_GET[‘form_submit’]) && $_GET[‘form_submit’] == ‘clear’)
{
$cache->remove($id);
}
This code checks to see if you selected the ‘clear’ button. If so, it calls the remove method in $cache to clear the cached file for $id. Right above this we are still initializing $cache the same way we use it when we want to cache a variable and we are still using the same $id ‘rs’.
Example 3 – Caching a Page
This is probably the easiest of them all because you don’t need to specify an id. The page is cached based on the url as the id. All you need to do it call $cache-start() after initializing the cache variable using ‘Page’ as the frontend. Everything else happens behind the scene. You don’t even have to call the save() method since anything outputted by the page will be cached. Here is the code, modified from example 1:
include ‘library/Zend/Cache.php’;
$frontendOptions = array(
   ‘lifetime’ => 10,
   ‘automatic_serialization’ => true
);
$backendOptions = array(
    ‘cache_dir’ => ‘tmp/’
);
$cache = Zend_Cache::factory(‘Page’, ‘File’, $frontendOptions, $backendOptions);
$cache->start();
$start_time = microtime(true);
echo "Not found in Cache
";
$data = ”;
for ($i = 0; $i < 1000000; $i++)
{
    $data = $data . $i;
}
echo sprintf(‘%01.4f’, microtime(true) – $start_time);
The few differences here are using ‘Page’ as the frontend instead of ‘Core’. Notice that I removed the if statement since we don’t have to check for a cache file, simply calling $cache-start() will do that for us. And finally I don’t save a variable to save since as mentioned above, $cache-start() takes care of this as well.
There should be a slight delay loading this page the first time since it’s not cached yet. If you reload the page multiple times, you’ll notice the value in the timer doesn’t change even though the page loads much quicker. This is because all the output sent to the browser is cached, including the timer. So in this scenario, the timer is pretty useless since the value will be correct only when the code runs outside of the cache every 10 seconds (the lifetime is set to 10 seconds instead of null for this example). Every 10 seconds of reloading this page, you should see the timer change value.
Additional Thoughts
Cache is a powerful tool. You can save resources and time which could also mean saving money (with very little extra code!). You can have a very dynamic site which requires lots of processing and heavily relies on a database queries, creating bottlenecks that could be easily alleviated by caching instead of buying a lot more expensive hardware.
There is a slight overhead in using cache though. This is because your system has to read and write to files where before it wouldn’t have had to. So make sure you are using cache in a way that makes sense. Don’t use it for the fun of using it, make sure you use it to solve a problem or make a process more efficient.
As seen from these three examples, there are many ways to cache, so you can be creative. Sometimes caching an array makes sense, sometimes caching a whole page doesn’t. You just need to think about what the need is and how to best address it.
Also know there are many other forms of caching that aren’t specific to php. Caching can happen at the client level just like it can happen at server level, not just at the code.
Feel free to leave any questions, comments, thoughts on this topic and thanks for reading.
*edit: Updated my math on improvement times plus added requests example from Wiseguy.
转载自:http://www.joeyrivera.com/2009/caching-using-phpzend_cache-and-mysql/
That's a good post..Well done.